Showing posts with label cake. Show all posts

Tuesday, August 12, 2014

Cubicle kitchen: Blueberry Cupcake Cones

I always think its kind of perverse that just when the rest of the country seems to have decided that it's fall, based on the back to school ads and slow introduction of autumnal items in the stores, Texas is actually ramping up the hottest weather of the summer.  I suppose I should just be grateful that I haven't seen any Halloween costumes out yet, although I am looking forward to pumpkin treats, like this one Dorothy from Crazy for Crust just posted.

But since it is most definitely still summer, I thought I would try my hand at putting a baker's spin on a classic summer treat with ice cream cone cupcakes.  I used one of my favorite tricks for moist and yummy cake from a boxed mix by using melted ice cream, which also went with the theme.  

Because of the sweetness of the cake and jam, I didn't sweeten the cream cheese frosting too aggressively, just a few cups of powdered sugar.  Instead of going with fancy piping, I thought using the ice cream scoop was simple but effective.  

Also simple but effective: microwaving  and mashing up fruit to make a quick jam.  You'll see this in another upcoming recipe, but I've now tried this with blueberries, grapefruit, and peaches and each one has worked pretty well.

One thing to keep in mind with these: I read varying reports on how long the cakes could be stored before serving, because the cones can turn sort of stale/soggy.  I baked them a day in advance of bringing them into the office and didn't frost until I was ready to serve.  I don't think staleness was an issue, if they were chewy it was just as much a factor as when they were freshly baked.

Blueberry Cupcake Cones
Frosting recipe adapted from Local Kitchen Blog: Jam + Cream Cheese Frosting

Ingredients

Jam
  • 3 cups blueberries
  • 1/2 cup sugar
  • 2 Tablespoons lemon juice
  • Dash dried lemon zest
Cake
  • 1 box Blue Raspberry cake mix
  • 3 eggs
  • 1 pint Blue Bell's Red, White & Blue ice cream, melted
  • 24 ice cream cones (not waffle or sugar)
Frosting
  • 1 lb (2 8 oz packages) Neufchatel cream cheese
  • 4 oz (1 stick) butter, softened
  • 1/4 cup jam (see above)
  • up to 1 lb powdered sugar
Directions

  1. Combine all jam ingredients in a microwaveable bowl.  Microwave for 10-12 minutes in 5 minute increments, stirring after each round.  When the mixture is thick and jammy, it's done.  Set aside.  Jam can be made days in advance and kept in a container in the fridge.
  2. Preheat oven to 350°.
  3. Stand cones up either in a pan specifically designed for the purpose or carefully in a mini muffin tin.  
  4. Mix all cake ingredients except cones in a large bowl until combined.
  5. Stand cones up either in a pan specifically designed for the purpose or carefully in a mini muffin tin.  Scoop batter into cones until half full.  (I had some leftover batter to make a few cupcakes on the side.)
  6. Bake for about 20 minutes, until a toothpick comes out clean.  Allow to cool.
  7. Cream together cream cheese and butter.  Add jam.
  8. Add sugar 1/2 cup at a time until you've reached the desired sweetness and consistency.
  9. When the cake has cooled completely, use an ice cream scoop to frost.  Spoon extra jam on top.

Monday, April 21, 2014

Cubicle kitchen: Lemon Poppyseed Pound Chicks

Did anyone hunt for Easter eggs yesterday?  We had a mini-hunt in the living room for four Cadbury Cream Eggs and eight Lindt Chocolate Carrots.  All the fun without the dirt or the actual eggs.

And no Peeps.  Ever since I figured out how to make my own marshmallows, they just don't hold the same mystique they used to.  And to be honest, they were always sort of like candy corn to me.  One was festive, but I didn't really crave more than that.  But they still look darned cute, so when I found a Chicago Metallic Chick Silicone Mold in Target, I kind of had to.

You could probably half this recipe to just make a dozen chicks, but I made the full batch with cupcakes and mini baked donuts for the remainder to make sure I had enough to bring into the office.  I'll have to think of an excuse to make more bird baked goods, because the only problem I had with these was people's reluctance to eat something so cute!


Lemon Poppyseed Pound Chicks
Adapted from Sweet Pea's Kitchen: Lemon Poppyseed Pound Cake
Makes 12 Peep cakes and 12 cupcakes

Ingredients

  • 1 cup (2 sticks) unsalted butter, softened
  • 1 1/4 cups sugar 
  • 4 large eggs
  • 2 tablespoons grated lemon zest
  • 2 teaspoons juice
  • 1 teaspoon lemon extract
  • 1/2 teaspoon vanilla extract
  • 1 1/2 cups cake flour
  • 1 teaspoon baking powder
  • 1/2 teaspoon salt
  • 1/3 cup poppy seeds, plus additional for sprinkling
  • A few cups powdered sugar and a few tablespoons lemon juice for glaze (your needs will vary)


Directions

  1. Preheat oven to 350°.
  2. In a bowl, cream together butter and sugar.  Mix in eggs, zest, juice, and extracts.
  3. Sift together flour, baking powder, and salt.  Add to wet ingredients, mixing until combined.  Mix in poppy seeds.
  4. Fill cake mold according to directions.  I filled a plastic bag with batter and cut the tip off to pipe it in 3/4 of the way.  If desired, remaining batter can be used to fill about a dozen cupcakes and be baked at the same time.
  5. Bake for 25-30 minutes (the cupcakes will take less time).  Allow to cool before attempting to remove from mold.
  6. When cakes have been released from the mold, place them on a wire rack set on a cookie sheet lined with parchment paper.  Mix powdered sugar with lemon juice to get a glaze consistency.  Drip and spread the glaze over the entire top of each cake, sprinkling with additional poppy seeds.  Allow glaze to harden before serving.

Monday, March 31, 2014

Cubicle kitchen: Chocolate Cream Cheese Muffins

The line between cake and sweet bread can be so very, very thin.  Particularly when it comes to muffins versus cupcakes.  Aside from a lack of frosting, does a muffin need to have a particular consistency?

These may be the kinds of questions that you ask yourself as you bake these, but I don't think you'll be wondering when you eat them, because you just won't care.  They are so yummy.  The pumpkin makes them so moist, and then the bite of cream cheese in the middle just takes it over the top.  The only thing I would change would be the cereal topping, because it loses it's crunch after the first day.

Other than that, though, these freeze really well and taste really good after being warmed up in the microwave after a few seconds.  Which might be why, after making sure my direct coworkers had their fill, I didn't put the rest of these out for the general population.  Instead, I brought them home, bundled them in the freezer, and have been enjoying them as dessert myself for the past week.

But there's no frosting, so I'm just going with muffins.  Delicious, dessert-worthy muffins...


Chocolate Cream Cheese Muffins
Adapted from The Table: Pumpkin Cream Cheese Muffins and Hungry Girl: Chocolate Caramel Muffins
Makes 21 cupcakes

Ingredients

For the filling:
  • 8 oz Neufchatel cream cheese, softened
  • 3/4 cup sweetened cocoa powder
For the cake:
  • 1 box Devil's Food Cake mix
  • 1 15-oz can pumpkin puree
  • 1 large egg (optional; Hungry Girl's recipe doesn't include an egg)
For the topping:
  • 1/2 cup chocolate cereal, crushed

Directions

For the filling:
  1. Mix together cream cheese and cocoa until combined.
  2. Transfer cream cheese mixture to a one gallon plastic bag, or use plastic wrap, and roll into a log about an inch in diameter.  Place in the freezer for at least a few hours, or overnight.  
  3. Before preparing the batter, cut the log into coins.

For the cake:

  1. Preheat oven to 400°.
  2. Combine pumpkin and egg.  Stir in cake mix and mix until combined.  Batter will be thick.
  3. Spoon one tablespoon of batter into the bottom of each cupcake liner. Press a coin of filling into the batter lightly.  Spoon a second tablespoon of batter on top of the cream cheese mixture.  If necessary, smooth batter evenly to ensure the filling is covered.  Sprinkle crushed cereal on top.
  4. Bake for about 20 minutes, until a toothpick inserted around the middle comes out clean (unless you hit cream cheese).  Allow to cool.

Tuesday, February 4, 2014

Cubicle kitchen: Mini Gingerbread Cake Donuts

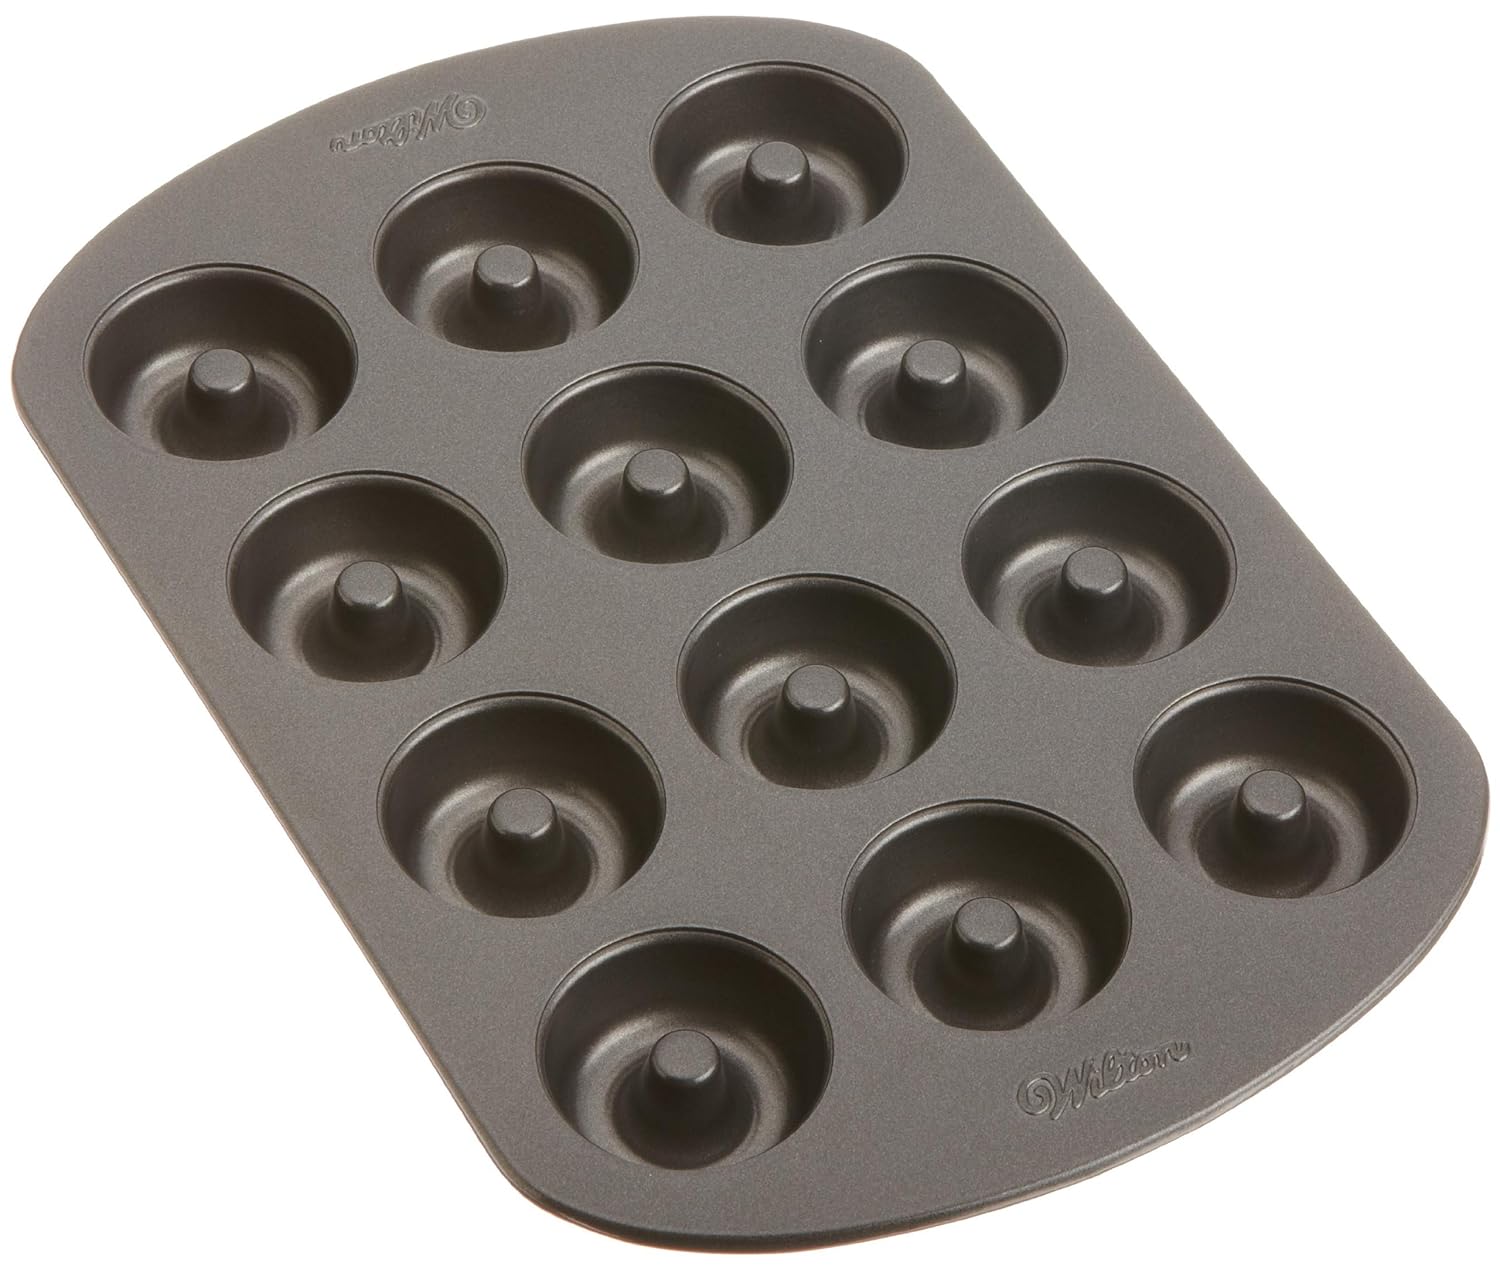
There are two reasons I like to bake mini things.  The first is practical: you get more servings of something when you make it smaller.  More servings means more people to share the sugar love with.  The second has nothing to do with practicality: mini things are cute!  Making anything miniature magically makes it more adorable.  It's a rule of cuteness that translates from bunnies to baked goods.  So I was really excited when I found these Wilton pans on clearance over the holidays:


I foresee many different donuts being baked, but I started with a gingerbread flavor, while the spicy holiday notes were still familiarly festive.  I used a cake mix because I have a few stashed away after the post-holiday clearance sales and there's no point in hoarding them.

Using a piping bag, whether it's a 'real' fancy one or one made from a plastic bag, really helps to fill the pan with a minimum of mess.  My first batch was slightly overfilled and ended up more like bundt cakes, but eventually I got the hang of it and ended up with another genre of desserts to add to my repertoire.


Mini Gingerbread Cake Donuts
Adapted from the recipe on the back of the Wilton pan packaging

Makes about 3 dozen

Ingredients

  • 1 3/4 cups cake mix (I used a Gingerbread Cake and Cookie Mix)
  • 1/2 cup buttermilk
  • 1 egg
  • 1 1/2 Tablespoons butter, melted
  • Optional glazing: cinnamon honey butter, powdered sugar glaze with pumpkin pie spice, brown sugar crumbles


Directions

  1. Preheat oven to 425°.  Spray pan with nonstick cooking spray.
  2. In a bowl, mix together cake mix, buttermilk, egg, and melted butter until just combined.
  3. Transfer batter to a large plastic bag, cutting the tip of one corner off to pipe the batter into the pan, filling half full.
  4. Bake 4-6 minutes until done.  Let cool in pan for a few minutes before turning onto a cooling rack.
  5. Place lining beneath the cooling rack and add any glazes you prefer.  Here's what I did:
    • Heated about a cup of cinnamon honey butter and dunked the top half of the donuts
    • Mixed a glaze of powdered sugar and buttermilk with some pumpkin pie spice and drizzled that on top
    • Sprinkled on some crumbs of cooked brown sugar from a previous baking adventure

Tuesday, October 29, 2013

Cubicle kitchen: Dessert Tea Sandwiches

Whenever I bring my treats into the office, I feel like a parent dropping their kid off at kindergarten for the first time.  I'm a little bit proud, a little bit scared, a little bit excited.  I know I should just leave them to fend for themselves and make friends, but I want so desperately to follow them around and make sure everyone likes them.

Is it wrong to think of baked goods as children?  It's probably wrong.  But then again, it's also probably wrong to make a frosting sandwich.  Out of bread baked with ice cream.  So wrong is clearly not something I'm concerned with.

But back to the metaphor.  These were yet another child that I knew was gifted with deliciousness, but their uniqueness made me anxious to explain exactly what they were.  I usually try to come up with something snappy, but this time I just reverted to 'bread made from birthday cake ice cream then sandwiched with frosting'.

This recipe is really very, very simple.  Aside from returning the recipe to it's original loaf pan rather than Bundt cake shape, I didn't change much from Katrina's recipe.  I did bake it longer, and even then found it ever so slightly underdone in the center.  One thing I did which I've left out of the recipe is the addition of chocolate chips.  Because though they were delicious, they made slicing thinly more difficult.  You could, of course, make your own frosting.  I do think that you would want to go with something light and fluffy like this Cool Whip frosting, though.  Nothing too thick or overly sweet.  Because that would be too wrong.

The reason I chose the name Dessert Tea Sandwiches is because I think these would be perfect at a little girl's tea party.  You know, for those of you who are parents of actual children, and not just cupcakes.


Dessert Tea Sandwiches
Adapted from In Katrina's Kitchen: Cake Batter Ice Cream Bread

Ingredients

  • 4 cups premium ice cream, softened* (I used Blue Bell's Birthday Cake flavor)
  • 3 cups self-rising flour
  • 1 container Cool Whip frosting (I used Chocolate)

* Leave on the counter for 10-15 minutes, or scoop some out and microwave for short bursts (not entirely melted).  Measure after softening.

Directions

  1. Preheat oven to 350 degrees.
  2. Mix ice cream and flour until fully incorporated.
  3. Pour into loaf pan (mine was about 6" x 11") lined with parchment paper, use a spatula to gently even out batter.
  4. Bake for 45-60 minutes, until the top is firm and a toothpick inserted into the center comes out clean.
  5. Allow to cool completely.
  6. Slice into 1/2-inch thick slices.  Cut these slices in half again.
  7. Frost slices and make sandwiches.  Chill in the fridge before slicing into triangles.

Monday, July 29, 2013

Cubicle kitchen: Banana Velvet Loaf Cake

There are lots of ways to save people.  When you donate blood, they like to tell you that you saved two lives.  That certainly feels good, knowing that for very little effort you can play an important role in someone's physical ability to breathe in and out.

On a much smaller scale, though, feeding people baked goods does its own kind of saving.  When I brought this to our coffee klatch, one of my coworkers took two slices and exclaimed that this was just what he needed to make his day better.  That also feels good.

To make sure that my iron levels were high enough to donate, I consciously made an effort to eat foods high in iron.  Last time the blood drive came through, I missed the cut by one point.  Along with my daily multivitamin, I had shrimp for dinner a few night, and tried beet greens for the first time.  I sautéed both leaves and stems with garlic, which was actually pretty tasty.  And with the deep, vibrant colors, you just know you're getting lots of tasty vitamins.

While chocolate cake doesn't immediately appear to be similarly nutritious, when it's made with a couple of mashed bananas instead of butter or oil, it's not without redeeming factors.  Plus, there's the old standby excuse of it being food that's good for you...good for your soul.


Banana Velvet Loaf Cake
Recipe from One Good Thing: Simple Three-Ingredient Banana Bread

My notes:
  • I used Mam Papaul's Black Velvet cake mix (saving the frosting mix for another time)
  • I added Peanut M&Ms into the batter, and sprinkled some dried banana chip pieces on top
  • This makes a very moist cake.  The recipe calls it banana bread, but I think loaf cake is much more accurate.  As one person remarked, this is much more like an indulgent chocolate brownie with banana than a banana bread with cocoa.
  • I made a full-sized loaf in a 11" x 6" pan, and a little mini loaf using a 4" x 2.5" pan for one of my mom's co-workers who celebrated a birthday.  The full-sized loaf took closer to an hour to bake, while the mini loaf was closer to 20 minutes.

Friday, May 31, 2013

FO Friday: Cupcake notebook of deliciousness

I don't have a finished knitting project to show you today, but last week I sent off another of my notebooks. (Full disclosure: it was actually two weeks ago.  Last week I wrote this post, then didn't hit publish before going out to dinner.  And near-midnight didn't feel like it was really Friday anymore, so I saved it.)  This time I remembered to snap some pictures using my phone before I sealed up the envelope, thank goodness.  And speaking of goodness, I decided to fill this notebook with more baked goodness, themed around some of the notebook owner's likes.  I got to tap into my inner child and do some drawing and coloring, and then I found cupcake recipes to go with them.

First, I turned myself into a cupcake with a little introductory page:

It's hard to decide on what kind of cupcake I am.  I think I'm a magical Willy Wonka cupcake that changes flavors with my mood.  But for the sake of putting a cherry on top, I went with a Cherry Vanilla Cupcake from Gimme Some Oven.

Next was her first fandom, Harry Potter.  I've only ever read and seen the first installment, so this muggle had to resort to being inspired by a well-known scene rather than being able to pick up on details:

Even without being totally into the Potter-verse, I'm always drawn to the smart and sassy heroines like Hermione.  And with that hair, I felt like Malfoy was easily translatable into a sour lemon cupcake.  So here's my cartoon cupcake take:


For Hermoine, I included a Triple Chocolate Cupcake recipe from Annie's Eats.  Partly because Hermoine's wild hair could be represented with scrumptious chocolate frosting, partly because the notebook owner loves chocolate, so I had to include a chocolate cupcake.  And as I hinted earlier, Malfoy is a Perfect Lemon Cupcake from Mel's Kitchen Cafe.  I feel like a lemon slice pretty accurately mimics his hair, right?

Another page, another worldwide fantasy fiction sensation.  This time, it was Twilight.  Again, not one of my own obsessions, but I took inspiration from one of the iconic images of the series, the cover of the first novel:


Kind of cute, right?  I have to say, even when you don't see most of them, drawing hands always feels awkward.  The accompanying recipe is Apple Cinnamon Cupcakes with Cinnamon-Marshmallow Frosting.

And finally, she likes purple and butterflies:


I'm kind of proud of this one.  The 'wings' are dried slices of pineapple on top of Hummingbird Cupcakes.  The only theoretical difference between mine and Martha's being that the slices of pineapple are cut in half before being dried, so they look like wings rather than flowers.  I really want to try at least that part of the recipe for myself sometime.

For more FOs (maybe ones with knitting!), go to Tami's Amis.


Tuesday, March 19, 2013

Cubicle kitchen: Black Raspberry Cocoa Cupcakes

If I was a negative person, I would be sad about all the things I will never have time to do.  All of the books I won't read, the projects I won't knit, and the recipes I won't bake.  Simply because my shelf, stash, and recipe box is already so full of great stuff.  Maybe if I won the lottery (in an unexplained miracle, because I never play the lottery) I could devote all of my time to stacking books in the 'read' column and casting off everything I cast on.  But all I can do it bake one recipe at a time.

And that's nothing to be sad about, because the results are always delicious.  This week I decided to try one of the recipes from the page-a-day cupcake calendar I grabbed on clearance at Half Price Books earlier this year.  Every day I peel back a page and get another recipe, or version of a recipe that switches up some of the flavors of yesterday to try something new.  I was drawn to it because it used fat-free milk, that wasn't one of my alterations.  And I love baking with berries.

The changes I made started with using some frozen black raspberries that I had stored away.  I chopped them a little, just because I was turning them into mini cupcakes and didn't want them to be too big.  This made baking time a complete guess, because the directions were for 20 minutes originally, but I was miniaturizing them, and then switching fresh for frozen fruit.  I wasn't sure what was going to win out in terms of lengthening or shortening the perfect time, so I just kept an eye on them.

Then I decided to use the same frosting that I had for those Black Velvet Sandwich Cookies, so I thought I might as well substitute a little cocoa into the cake batter.  It doesn't make much of a difference, but I didn't have more cocoa on hand, and I didn't want to further jeopardize the baking potential of the batter.  As it was, it added that little bit of extra richness that would tie the cake in with the frosting on top.  If I make these again, I might venture into adding some chocolate chips into the batter, just for the sake of it.

Another successful outing for my baked goods at the office, another recipe crossed off the list.  What's not to be happy about?

Black Raspberry Cocoa Cupcakes
(Adapted from Glazed Blueberry-Lime Cupcakes from The Cupcake Calendar 2013 and 500 Cupcakes)
makes about 5 dozen mini cupcakes

Ingredients:
  • 4 Tablespoons margarine, softened
  • 2 Tablespoons unsalted butter, softened
  • 2 Tablespoons Brummel and Brown
  • 1 cup sugar
  • 2 eggs
  • 1 teaspoon vanilla extract
  • 1/2 cup fat-free milk
  • 2 cups (minus 1 Tablespoon) cake flour
  • 1 teaspoon baking powder
  • 1/2 teaspoon salt
  • 1 Tablespoon cocoa (I used Dutch processed)
  • 1 cup frozen black raspberries, chopped
  • 1 teaspoon dried orange zest
Directions:
  1. Preheat oven to 350 degrees.
  2. Cream margarine, butter, and spread together with the sugar.  Add the eggs one at a time, followed by the vanilla and milk, mixing well after each.
  3. Sift together the flour, baking powder, salt and cocoa.  Add to wet ingredients slowly beating until incorporated.  Fold in the raspberries and zest.
  4. Fill the mini cupcake liners 2/3 full with batter and place in the oven.  Let bake for 15-20 minutes.

Tuesday, February 5, 2013

Cubicle kitchen: Gingerbread Cubed

Gingerbread is one of those things, like fresh cranberries and peppermint-flavored things, that seem to disappear for the most part come January.  And while I understand the value of seasonality and limited availability, I wasn't quite ready to let the warm, spicy comfort of gingerbread go yet.  Plus, I have a few boxes of mix that were on super-duper clearance because of that sudden disappearance.  So last week, I refused to give into the mainstream, and kept the festive flavor going.

More than once, I've used ice cream to enhance a cake mix.  Just the week before, I made one with pineapple mix and coconut sorbet.  But why stop there, I thought?  Why not also utilize this wonderful frozen treat in the frosting of the resulting cake?  Especially when you happen to have a 1/2 gallon of Blue Bell's Gingerbread House.  That's where the 'cubed' comes from in the title, because you've got gingerbread mix, made with gingerbread ice cream, topped with gingerbread frosting.


Gingerbread Cubed
makes a 7 x 11" pan
(adapted from Cookies & Cups)

Ingredients:
  • 1 box of Hodson Mills Whole Wheat Gingerbread Mix
  • 1 egg
  • 1 1/4 cups melted Blue Bell Gingerbread House ice cream (less than what it calls for for cakey gingerbread, more than for roll-out cookies)

Directions:
  1. Preheat oven to 350 degrees.
  2. In a bowl, mix the gingerbread mix with the egg and ice cream.
  3. Spread the batter (it will be very thick) into a pan lined with parchment paper.
  4. Bake for about 20-25 minutes, or until a toothpick comes out clean.  Allow to cool completely.
For the frosting, I used the same Gingerbread House ice cream along with this recipe from Culinary Concoctions by Peabody.  I needed the full 5 cups of powdered sugar, then I let it chill for a little while before frosting the cake.  I cut the cake into squares, then used the parchment paper to lift them back into the pan so I could frost them in one big square but not wrestle with actually cutting the cake once the frosting was on.

Tuesday, January 22, 2013

Cubicle kitchen: 'If you like Pina Coladas' Cupcakes

This week, I baked a little overboard.  First, I made some savory cookies, which I'll blog about later this week.  And then, I started feeling like I needed to make something sweet.  I'm not sure if it was a sense of balance, or just my sweet tooth that really spurred me on, but it had to be done.  Thankfully, we usually have enough on hand for me to make those kind of decisions on a Saturday morning.  Especially when it comes to ice cream in the freezer.

I have to once again highly recommend melted ice cream as an add-in for boxed cake mix.  You get a really moist cake, and the opportunity to play around with some flavors.  And it's the combining of flavors that really attracts me to baking, while not wanting to risk messing around too much with the delicate science of baking and creating something that didn't rise/spread/whatever.  This is a great coming together of convenience and experimentation.

And every instance of this cake has gotten rave reviews.  Everyone screams for ice cream.  This time I thought I would give everyone a chance to escape to the tropics with a beachy bake.  Because in Texas, we all like Pina Coladas, and we could use a little more rain...


'If you like Pina Coladas' Cupcakes
made 24 cupcakes and about 30 mini cupcakes

For the cake:

Find the recipe for the cupcakes at Cookies & Cups.  To make sure you have the right amount of ice cream, melt it and measure out 2 cups rather than relying on the pint not having too much air whipped in.

I used:
  • Pineapple cake mix
  • 1 1/2 cups coconut sorbet, melted
  • 1/2 cup toasted coconut ice cream, melted
  • 3 eggs
For the glaze:

I made my stand-by glaze with powdered sugar and pineapple soda, drizzled onto the cakes after they had cooled.

Thursday, October 18, 2012

Cubicle kitchen: Peppermint Patty-cakes

I have a tendency to stockpile ice cream.  It's not my fault, Blue Bell just has so many good flavors that are only available in half gallons.  And given that I eat them one serving at a time, it takes a while, and sometimes I'm just ready to move onto another flavor before working through a full carton.

Which is why I love the fact that ice cream can be melted and baked into a cake mix to give you a moist and delicious cake with a variety of flavor combination possibilities.  I decided that chocolate and mint would be a refreshing one for this week.

Peppermint Patty-cakes
(adapted from Cookies and Cups)
Makes about 72 mini cupcakes

Ingredients:

Cake:
  • 1 box Devil's Food cake mix
  • 1 pint mint ice cream
  • 3 eggs
  • 1/2 tsp peppermint extract
Glaze (see directions for amounts):
  • powdered sugar
  • water
  • peppermint extract

Directions:
  1. Make sure your ice cream is completely melted.  You can either leave it out on the counter for a while, or take a shortcut and zap it in the microwave until it's soup.
  2. Preheat oven to 350 degrees.
  3. Beat together melted ice cream with cake mix, eggs, and extract.
  4. Fill mini-muffin cups 2/3 full with batter.  Bake for about 10 minutes, or until a toothpick comes out clean.  Let cakes cool on rack.
To make glaze:

  1. Fill a mug at least halfway with powdered sugar.
  2. Add a drop or two of peppermint extract.
  3. Add a little bit of water and stir, repeating until the glaze is the right consistency.  It should be thin enough to drizzle onto the cakes, but not too thin.  Be careful when adding the water, it should only take a very small amount, perhaps a teaspoon.
  4. Drizzle onto the cakes.  I like to do this while they are sitting on a wire rack with a cookie sheet beneath it to catch the drips.
  5. Repeat until you've glazed each cake.


Friday, September 28, 2012

Cubicle kitchen: Nutty Cake Balls

Cake balls are so deceptive.  The are composed of some very simple steps, but each of those steps adds up to total a process that I would hesitate to call easy.  I started off so innocently on Saturday morning after breakfast with my box of cake mix, but I ended up working on these on and off almost through dinner.  It's the fridge time that you just can't rush.  Could certainly divide some of the steps among a few evenings after work if you had an office potluck on Friday, and you felt your co-workers deserved it.

And then another layer of deception, because after spending a day baking, mixing, chilling, rolling, chilling, dipping, sprinkling, and chilling some more, I took a look at my cake balls and thought they looked kind of ugly.

Okay, so they don't look so bad in the photo.  But they're a little big, and surrounded by the dirty bowls and with my hands covered in batter and chocolate, they looked a little more sloppy than perhaps I had imagined in the beginning.  But then, I have a tendency to imagine cookbook-type photo shoots.  And that rarely happens.

And, of course, no one really cares whether it looks like a truffle in a Parisian chocolatier's window or a truffle in the dirt waiting to be sniffed out by an intrepid pig.  They just see chocolate, frosting, and cake goodness.  I ended up with enough 'inventory' for three separate deliveries of cake balls this week.  On Monday, 16 cake balls disappeared within two hours of being left out.  That may well be a record.  And today, the third and final day, they disappeared at almost the same rate.  Plus, I also had several in-person visits to my desk to berate/thank/congratulate me on such a tempting treat.

There are lots of possible combinations, between the cake, frosting, and chocolate coating.  But I think I'll give myself a little break from this 'easy' treat for at least a week or two.  Besides, my co-workers would probably prefer something at least pretending to be healthier next week.

Nutty Cake Balls

(Adapted from Bakerella)

Makes about 50-60 cake balls

Ingredients:
  • 1 box of Butter Pecan cake mix
  • 1 can of diet root beer
  • 1 can of cream cheese frosting
  • 1 cup chopped walnuts (this is approximate, and of course you can use a different nut, like pecans)
  • various chocolate for melting, I used white chocolate, dark chocolate, and butterscotch chips, and milk chocolate Candy Melts, not sure how much, but at least a bag of each to be safe
Directions: 
  1. Bake the cake according to the directions on the box, but substitute the can of soda for the oil, eggs, or any other add-ins.  
  2. Allow the cake to cool completely.  You can utilize the fridge for this, but don't cheat and wait until it's just warm, it should be completely cool.  This helps with the texture, so the cake doesn't disintegrate into the frosting.
  3. Take your beautiful and cooled cake, and rip it to pieces in a large bowl.  Mix in the frosting, and half of the nuts, saving enough to sprinkle on the cake balls later.  You can use a spatula, or your hands, just try to make sure everything is well incorporated.  At this point you might like to place the bowl into the fridge to chill a little more to help make the next steps a little less messy.
  4. Take the cake/frosting mixture and roll into balls, using about a tablespoon for each one.  Place balls on a cookie sheet or other tray, lined with parchment paper.  As you fill a tray, again, place in the fridge to keep them cold.
  5. In a bowl, melt your first round of chocolate.  You can do this with a double boiler or in the microwave, but be careful in the microwave.  Use 50% power and stop frequently to stir.  White chocolate in particular will seize up very quickly, and often chocolate will continue to melt after heating as you stir, reaching the perfect consistency.
  6. Take out one tray of balls.  With a fork or spoon, dip one ball at a time in the melted chocolate, making sure to coat completely, then replace on the tray.  Sprinkle with chopped walnuts and place back into the fridge or freezer.  This is best done in small batches at a time, both for the sake of keeping the chocolate warm and the cake balls cold.  I found that after about 6 the process devolved into a bit of a mess.
  7. Repeat the previous steps as many times as it takes to get every ball coated and delicious.